Challenge

chal-lenge: noun a calling to account or into question

Follow along as I challenge the tricks, tips, clever craft and decorating ideas and "simple" recipes that we clip, bookmark, and "pin" for trial at a later date.

Are they really worth the effort? Time (and I) will tell!


Saturday, January 4, 2014

Happy New Year!

 
I haven’t heard many New Year’s resolutions cross my path, either on-line or in person.  Has everyone given up?  Maybe the time between Thanksgiving and Christmas was too short and you are still in shock having to produce two magnificent holiday celebrations so close together.  I know I feel it has all been one big blur.  I have to admit that I didn’t even stay awake until midnight this year to assure myself that the world will indeed go on in 2014. 

Every January I like to set goals for the coming year.  It doesn’t hurt to look back at the previous year and evaluate your life: where you’ve been, what you’ve done and your attitude along the way.  I find it’s easier to adjust my path on an annual basis while the memories are still fresh.  Besides, some habits are really hard to break and I have to renew my commitment to keep trying.  Diet and exercise are always at the top of the list.  I’m not sure I’m doing any better with these two but I think about it a lot! I have some crazy fitness goals for 2014 so I’ll really have to step up my game.

My new goal for 2014 (drum roll please) is to perform an act of charitable giving each month throughout the year.  I normally give to the United Way throughout the year, the Salvation Army at the holidays and a smattering of donations to other organizations here and there.  These donations are surely helpful to the recipients but not very personal for me.  There are so many local not-for-profit organizations that are in need of simple supplies and volunteer hours.  We hear their pleas at Christmas and give, but what about the rest of the year?

 In a nutshell, I am pledging to choose an organization each month and make a donation of money, supplies and/or time.  This exercise is sure to be very eye-opening for me and I look forward to the challenge. Putting this goal in writing is my way of making me accountable to me, but please feel free to prod me along if you find me slipping.  Phew, let’s see how I do!

Sunday, December 15, 2013

North Woods Santas


Many years ago, when crafting was still popular, I found the directions for these beautiful North Woods Santas.  They were easy to assemble and my friends and I got together one night and mass produced them to sell at craft shows that season.  Of course I had to keep a set for myself as well.  Every Christmas season I pull them out and adjust their coats and beards and arrange them on a side table for display.  Having packed them away for about 25 years now, they are looking pretty rough. 

A few years ago I decided that they were too shabby and that they wouldn’t be making their annual appearance.  When I had finished decorating that year, my youngest daughter looked around and asked where I had put the Wise Men.  I never thought of them that way but she was right, they are very humble Wise Men and I felt compelled to pull them out of their box for another season.

I don’t know why I was surprised that she had noticed, she was just a baby when I made them and they had been on display each year since.  I tucked that little piece of information into the corner of my mind to be pulled out at a later date.  This year she mentioned the need for more Christmas decorations and I went right to work on her very own set of Wise Men.  Little did I know what a challenge that would be.

The materials for the men are fairly simple:  wool for the coats, fur for the trim, wool roving for the beards, and little decorative items for them to hold.  No big deal.  Off I went to Joann Fabrics (the only fabric store in the area) for materials.  Can you believe they did not have any wool, not to mention any of the other things on my list?  Yikes!

Now what?  You guessed it, off to the thrift store.  I rifled through the skirts and coats and came up with a gray wool skirt and a cream colored cape that I thought I could make work.  I still needed fur and laughed to myself (well maybe out loud, too) when I found a tattered mink stole on the sale rack for $3.  You have to know I grabbed that one up!  I also found a little sweater that had a white rabbit collar.  I took the collar off the sweater and offered it back to the thrift shop.  I really didn’t need it.

My skills are a little rusty and it took me a while to get the men assembled, but I did.  Finding the little decorations was crazy and I made many trips to the craft stores looking without success.  Back to the thrift shops where I found a little basket and some dried grapevines that I used to make my own little wreaths. I was able to salvage other trinkets from past projects to repurpose.  There’s always something extra hanging around. Fortunately my mom still had the wool roving for the beards and she sent that along to me.  There is quite a bit of that left over so stay tuned.

Phew! They are finally finished and delivered to Massachusetts where they proudly stand as a centerpiece on her dining room table.  I love sending a little piece of myself to my daughters.  It’s especially nice at Christmas when we are apart and they can have a little reminder of their childhood home at the holidays.

Saturday, November 23, 2013

Festival of Trees - Complete!

So I've tweaked and fussed and rearranged the ornaments on this little tree until I've just about worn them out and I think they are the best they can be.  I've glued everything to the branches so that the decorations don't come off during transport and delivery.  It's been fun but now it's time to let it go.  These are the ornaments that I made myself:


With a little help from the Dollar Store, I added the garland, snowflakes and the topper.  Here it is all ready for delivery.  I hope it does well at the auction!

Sunday, November 17, 2013

Festival of Trees Part Two


My work on the silent auction tree continues.  Having determined that this would be a snowman themed tree, I needed to find some snowman ornaments.  I searched Pinterest and leafed through my Christmas craft books for some time before making my selection.  Several years ago I had crafted sets of folk art ornaments made from an instant paper mache and I thought it would be fun to use this idea as a base for my snowmen. Off I went in search of the materials to make these cute little guys. 

 
The project consisted of gluing together Styrofoam balls and applying the wet slimy gray mixture to the snowman shape.  The paper mache was sticky and I had to keep my hands wet so that I could smooth the stuff at least semi evenly over the shape. But that's the beauty of paper mache and folk art, imperfection just adds to the charm. I used so much water that it took a few days for them to dry out.  Once dry, I gave them a light sanding and added the little noses which took another day to dry.  All the little guys received two coats of white paint, with another day to dry.  When I was done with the white, I painted the eyes, buttons and noses.  More drying time. Do you see where I’m going with this?  So much time spent waiting between each step.  This is why I started the tree so early.  I had a feeling this would happen.


Now that the snowmen were all painted, they looked cute but a little dull.  These guys needed a little glitz.  Out came the mod podge and they all received a coating.  Hmm, still not quite right.  Glitter!  Glitter makes everything sparkle and shine.  The addition of a little silver bling around the necks and they are just right.
Here they are on the tree.  I had hoped to finish decorating the tree this week-end but no such luck. I’ve started working on the next little ornament but you guessed it, it needs to dry. I’m still searching for a little this and that to finish up.  Stay tuned, it can’t possibly be long now!
 

Tuesday, November 12, 2013

Wise Men

Many years ago, I’m thinking about twenty or so, I was inspired to make a set of wise men for my mom for Christmas. These “men” were a labor of love and I enjoyed every second of their creation. The fabrics were rich and the jewels were shiny and fabulous. I used clay for the first time, fashioning heads and hands. They were magnificent and Mom was thrilled to receive them as a Christmas gift and she displayed them for several holiday seasons.

Fast forward to the year of George, an active beagle puppy. I wasn’t present, but the story is that George ran into the house and headed straight toward the wise men. For some crazy reason he chomped on one of the men’s heads before leaving him for dead. My mom packed them up and handed them over to me for repair. When I opened the box I was horrified by the devastation! I couldn’t even take them out of the box. Up into the dark, creepy crawl space they went. Each year I moved the box farther back into the dark shadows but I couldn’t forget about them.
A few weeks ago I decided to resurrect the men and see what I could do to bring them back to life. They were a bit wrinkled, their beards were a little wild, and the trim on their robes was a little loose but hey, I could work with that. Before long, the robes were pressed and the trims were reattached. After a little hair and beard trim two of the men had been restored to their majestic selves. It was time to tend to the unfortunate third. Off with his head! I worked the new chocolate brown clay in my hands until it became soft and pliable. Before long I had shaped the head and added all the facial details. This guy was really coming to life. I painted his eyes and reassembled all the pieces giving new life to this injured soldier.

Refreshed and reunited, these guys don’t look like they have spent the past six years in a box in my crawl space. They now stand proudly waiting to usher in the holiday season. Merry Christmas my wise men.

Sunday, November 3, 2013

Festival of Trees Part One

I know you are all just dying to see how I am decorating my little tree for the Festival of Lights Silent Auction. Par for the course, I committed myself to this project without really thinking it through. I have been collecting ideas for making ornaments created from old book pages. I thought this little tree decorating project would be the perfect motivation to try out these very economical pieces.

Only after picking up the tree did I really start to look at the directions for these book page ornaments. They are way too fussy for me. Believe it or not, cutting and paper is a very precise art that takes quite a bit of patience. And if you are doing several of one pattern, it’s hard to make them all look the same. Scrap that idea!

I’ve switched gears and decided to work off a snowman theme. Who doesn’t like snowmen? They are reminiscent of our childhood and bring a smile to everyone’s face. I have started the decorating with a base of shiny red, green and white glass balls evenly distributed. No, I didn’t actually measure them, but that isn’t a bad idea! I have tied them on with a red ribbon for some added texture.

That was easy, now what? Thinking snowman, little red mittens came to mind. I remember my mother knitting these tiny mittens that we used for package decorations and pinned to our coats for a little festive flair. I gave her a call and in a few days I had received the original page of directions she used from a 1966 Workbasket magazine. How sweet is that? After several faulty starts, I managed to work through the pattern and obsessively knit up five little pairs of mittens. My eyes were starting to blur as I worked feverously into the early morning hours to get them done.
.

So here is ornament #1 added to the little tree and I feel that I have made a good start. Which ornament will I obsess about next?

Sunday, September 15, 2013

Book Lamp

The director of my local library requested donations from local artisans for the library’s silent auction. Hmm, what could I make? I immediately went to my project board on Pinterest to see what I could find. It seemed like a book-related piece would be the most appropriate. As everyone knows, I love old books and I love the idea of upcycling. I also have experience with silent auctions and know that people are really out looking for a bargain. Many times valuable items go for a small fraction of their value. I wanted to create a quality piece that didn’t cost a lot to produce. I checked out my supply of stuff on my shelves and I think I found the perfect project.
While working on a budget, I still wanted to make sure that my project would be worthy of being amongst real artisan offerings so I decided to take it one step at a time and make my decision whether or not to proceed after each step. The first step was to paint the books. I saved money by using paint that was already on my shelves. I sanded the books and applied the paint in several layers including sponging and antiquing to give the books an interesting look. The first step worked out well so I moved on to using decoupage to apply the fancy text to the spines, adding more visual interest.

Pleased with the design of the books, it was time to move on to the real nuts and bolts of the project. A lamp isn’t much good without a light bulb that actually lights up. Tom is so generous with his time and talents. He always finds a way to help me accomplish my creative goals. Wanting to make this a true upcycle project, I used an old silver lamp that my daughter no longer wanted. It was the perfect shape and size. It did take some maneuvering on Tom’s part to drill through all three books so the silver tube could be inserted. The books got a little scuffed up and I debating about moving forward but once I calmed down, I decided that this just added to the shabby chic style of the books. A little extra paint here and there and I was back on track.

I found a little lampshade at one of my second hand shops and knew it would be the perfect size. And for $.75, the price couldn’t be beat. I painted it up using the same colors I used on the books so that it would coordinate. The trim on the lampshade was the most expensive part of the project. I found the perfect trim at Joann’s but it was a bit pricey. I took advantage of the long line at the register and pulled up a 40% off coupon on my phone. Score! I’m really pleased with how the project turned out and hope it does well at the auction. It’s one thing to give projects away but putting one up for sale is nerve wracking!
It was fun to put this project together on a budget. I’ll be curious to see how well it does at auction. If you want to make your own lamp, you can find a great tutorial here. I modified the material list a bit so that I could use what I had on the shelves to save a little money. Check out your shelves and see what’s hanging around for your next project!

Friday, August 30, 2013

Stepping Stone


My husband has been working steadily on the construction of a camp in Loon Lake which is in the Adirondacks. It’s exciting enough to see the structure rise and indoor plumbing be installed but it’s also exciting to be getting to the point of talking about finishes and finishing touches.  We aren’t quite there yet, but adding a little touch when we can gives us a little encouragement and allows us to dream of the time when our vacation home will be complete. 


Last year my sister and her husband gave us thisbeautiful stepping stone with the signature loon in the center  We’re a long way off from any landscaping so the stone has been just leaning up against the wall waiting for a home..
  This spring my husband and I were working away when we both looked at the stone and then each other and said, “Something special needs to be done with this stone.” 


Our idea was to create a decorative focal point that would grab your eye when you walk into the camp.  The half wall that encloses the kitchen seemed the perfect spot. Tom did some quick measuring and we brought the stone home with us to get started on our project.  I have been nagging about wanting to use some stone in the interior but up until now, Tom hasn’t been receptive to the idea.  That is until now. 


We found sheets of river rock at Lowe’s that quite conveniently fit into the allotted space.  Tom did have to trim around the circular stepping stone but the sheets are made with mesh and are really easy to cut.  Any extra stones were used to fill in here and there where needed. Once the stones were attached to the backer board, it was time to grout.  I had the great idea of using a pastry bag and filling in around the stones.  Yikes!  It took us both about 3 hours of back breaking work to get all the cracks filled.  After letting the grout dry, we decided that we didn’t like the rough look and added another layer of grout to smooth it all out.  We both agree that it looks much better this way.


Ta da! Isn’t this just the perfect little touch? It makes us smile every time we walk in the door.  I know we will add other touches along the way but this one is very special.
 

Sunday, August 25, 2013

Rustic Log Lamp


Camp decorating continues with this little project.  I’m having a good time creating pieces that refurbish flea market finds with a nod to nature. Part of my challenge is to spend as little money on the pieces as possible and I feel that I’m doing pretty well.  It’s also fun decorating a space where I can use the terms rustic and shabby chic to excuse any slip-ups.  Hey, don’t judge me I’m having fun. 


I was sitting outside our camp a few weeks ago enjoying the fresh air and scenery when a light bulb lit up in my head.  How about a lamp made out of a log?  It might sound crazy but lamps can be made from just about anything.  Wouldn’t a log lamp be perfect in the living room?  This was an idea I had to run by Tom because he would be the one to assemble it all.  Of course he was up for the challenge and went out to the woodpile to see what he could find.  Voila!  The perfect log was just waiting to be snapped up.  What makes a perfect log you may ask?  One that is already cut to size is handy for sure.  A nicely textured bark with a little moss growing up the side doesn’t hurt either.


Tom fashioned a base out of a piece of the maple we recently purchased to make up the bar.  So far the project cost is $0!  Unfortunately he couldn’t use any of the old lamp parts in my arsenal and purchased new pieces for $15. Once assembled, I sanded the base and applied several coats of polyurethane.  I started with a spray so as not to disturb any of the moss.  Once all the intriguing bits and pieces were adhered I brushed on the really durable stuff.  Nice!


Now for the lampshade.  If you’ve ever shopped for lampshades you know how expensive they can be.  Besides, I wanted something a little out of the ordinary.  I knew how I wanted to remake the shade but didn’t want to spend even the $10 it would cost to buy a new one to use as a base.  Hmm, which of my “junk” shops has the most potential?  The Salvation Army!  There I found a disgustingly dirty lampshade in the right size and shape for $.99.  What a find!


After cleaning up the lampshade, I started covering it with some jute I found in my stash.  I dabbed a bit of glue here and there to hold it all in place.  Ah, just the style I wanted.  As a little extra touch, I attached a ceramic leaf I had hanging around in my box of fall decorations. I think this will be just perfect as a woodsy accent piece in the living room.  At a cost of $16 who wouldn’t want a lamp made from a log?  Don’t all speak up at once…..
 

Thursday, August 15, 2013

Mexican Pillow

 
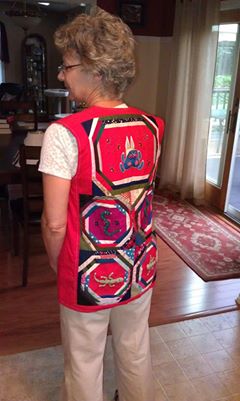
I have just finished a really fun project!  While making the rounds through the pre-owned clothing section of one of my favorite shops, I came across this fascinating vest.  Isn’t it great? 
 
Anyone observing me walking through these stores must really get a show as I gasp and laugh out loud over some of the things I find.  And then I grab them like someone else is shadowing me just waiting to take my great find right out of my hands. This was definitely one of those pieces.  Take a peek at these adorable reptiles.  Who wouldn’t just laugh out loud?


The vest as a piece of clothing really isn’t my style but the pieced squares used to make the vest are really well done.  I felt certain that I could deconstruct the piece and turn it into a pillow for someone else’s home.  Really, what am I going to do with a Mexican reptile pillow?  It doesn’t exactly fit my traditional décor.  But I know someone down south with a lovely patio where a pillow like this would feel quite at home. Sold, for $1!
 
There was quite a bit of decorative stitching that had to be picked out along with the seams.  I situated myself out on my deck with a drink nearby and got to work.  I was proud of myself for taking my time and really thinking before I made any cuts.  Maybe the sun and the cheerful fabric had a bit to do with that.
 
 
My patience sure paid off as I was able to reuse some of the red fabric to create the fourth edge and the lining as the back of the pillow.  It was a pretty easy job to sew the back and front of the pillow together.  It all worked out so nicely. I just love it when that happens. Isn’t it a festive little piece?

Friday, July 12, 2013

The Glassware Exchange

It’s no secret that I have a thing for “stuff”.  I so often boast about my finds that you might think I have a house just full of my flea market finds.  Not the case!  I have a very uptight decorating style:  a few special pieces and some regulated pieces of artwork on the walls of each room.  I can’t apologize for being so structured.  I like a nice orderly house and hey, it saves on dusting.

 I really think it’s the thrill of the hunt that keeps me shopping.  That and my fear of missing a bargain outweigh my need for an orderly house.  I also like to imagine the story behind each piece. Although I’m very good about not buying things that I don’t have a place or a use for, it doesn’t stop me from trying to find a home for something really special. 

Recently I was making my usual round of “junk” shops and found these sweet little bar glasses.  I don’t believe they have ever been used.  The gold leaf is in perfect condition and the glass itself is clear and unscratched.  I can imagine they were a wedding present to someone in the late 50’s.  I have a feeling this was a bride who never drank and didn’t encourage her husband to do so either.  Very unusual for that time period (at least from what I know from watching Mad Men).  I’m sure she appreciated the thought but that she packed them away and waited for that special occasion that never came.  What other reason could there be for not using something so beautiful? 

The set included 16 glasses that were priced at a mere $12. I had no use for the glasses but was having a hard time leaving them behind.  I had already found the authentic Mad Men bar glasses for my daughter and she didn’t need any more.  I have a sister who collects vintage glasses but she has so many I didn’t really think she would want more.  Surprise!  I sent her a picture and she said “yes”!  It wasn’t long before these little beauties were purchased and packaged up ready to go.
 
That same night I received a text message with a photo of some coffee cups and saucers that my sister thought I might like. She shipped the cups from Florida and I shipped the glasses from New York.  How funny that we each received our package on the same day.  The cups and glasses although each beautiful in their own way are only things while the connection between sisters is priceless.  Connections can be made through the most simple of things. How nice that this time this glassware exchange could do that for us. 

Monday, September 3, 2012

Kindle Cover

No project from Mom this week so I thought I would go it alone. Hopefully she will be able to catch up soon. I do enjoy her creativity.

Okay, I hear you moaning about yet another book project. I can’t help it, I just love working with books. I also love shopping for them at the many used book sales in the area. Although there are many books to choose from, finding a hard cover book with a
pretty cover that is exactly the right size as a Kindle has been a little tricky and I have been looking for a while. This particular book was so perfect for my project that my little hand just reached out and snapped it up before anyone else could get it. Like anyone else would want an old copy of Madame Bovary when they could pick up a Twilight novel or something equally as intriguing. What was I thinking? I really love the gold and muted red of this cover.

I have wanted to make a book cover for my Kindle for quite some time now. I feel it’s a nice mix of old and new technology. I did a bit of research before starting and found this great tutorial: www.unexpectedelegance.com if you are interested in making one for yourself.

Friday, August 24, 2012

Challenge #5


Given the later date of this post, you can see that we have been having a little trouble either coming up with ideas or being motivated enough to get them done. I have been collecting some great ideas on Pinterest while Mom has been visiting yard
sales. I find the Pinterest route much easier. It’s difficult to come up with an idea on the spot at a yard sale. Most often you find a lot of the same household stuff and it isn’t especially inspirational.

So I was cruising along on Pinterest the other day and came across an idea to make hats out of old sweaters. There is no shortage of used clothing stores in my area so off I went in search of materials. There was so much to choose from! The sweaters with some type of banding on the bottom work out the best because they hold their shape very nicely. No sweater cost more than $2. I did feel a little badly about cutting up perfectly nice sweaters and maybe taking them away from some poor little child, but there were plenty more from which they could choose. I tried on the peach sweater and decided it fit nicely and was too cute to cut up so I replaced it with a yellow cotton sweater (not pictured).

Thursday, July 12, 2012

Challenge Week #4


I asked my daughter to stop at a consignment shop with me last week-end. I thought a set of fresh eyes might help with my choice of project for the week. We went in the shop with no idea of what the next project would be. We wandered around for a bit not seeing anything very inspirational. My daughter picked up a set of wooden coasters as a possibility but I couldn’t think of anything to do with them. I did like that they were wooden and the center portion where you would place a glass looked perfect for framing something. Even though they were only $3, I didn’t buy them. I was thinking about the coaters as I drove home. Of course once I got home I had an idea and I headed back to the store to pick them up.

Saturday, June 30, 2012

Challenge: Week #3

I’m feeling like my regular haunts are not putting forth any creative material for my upcycling projects. I was in a bit of panic because I couldn’t find anything. I was headed down to the Hudson Valley to have some fun on a wine tour and wouldn’t have time to do any of that type of shopping. Maybe stop at some yard sales along the way? That didn’t sound like much fun to me. Although add a little wine and I might see things in a different light!

When I pulled into my daughter’s driveway, I could see that one of her neighbors had been cleaning out their back room. Several artist canvasses, some still wrapped in plastic, were piled up next to the dumpster ready to be taken away. I was sure I could find a project somewhere among them so I gathered up a few and tossed them in the trunk to take home with me. Dumpster diving wasn’t included in the contest rules, but I don’t think Mom will mind.

Sunday, June 17, 2012

Challenge: Week #2

It’s week two and we’re still going strong! I love this project Mom chose. She found this beat up old high chair at a yard sale. You can see that the arms are missing and it’s just covered with spattered paint. Obviously someone else took an old piece of furniture that was no longer useful in its original form and made a modification. I wonder how long it was used as a painting stool. It’s fun to see all the different colors of paint and imagine the rooms that were given a fresh coat of paint.


Always one to look beyond the obvious, Mom decided to freshen up this interesting piece with a new coat of paint (all one color this time!) and give it a new use. She has a green thumb and has many plants around the house. This unique plant stand provides a variety of height in her collection as well as fun visual interest. It’s the kind of thing that makes you say, “Hmm, why didn’t I think of that?”

Sunday, June 10, 2012

Challenge: Week #1


Well we did it! Mom and I both finished our projects on time this week. When we talked midweek I wasn’t sure it was going to happen. A week isn’t a very long time to find a treasure and develop it into a project and we were both feeling some pressure. Time will tell whether or not we can keep up the pace.

My project began with a set of Smithsonian souvenir cookie cutters. The set includes a star, flag, airplane, elephant and dinosaur. When I saw them in the store I just stared at them trying to figure out how I could use them. My daughter stepped up next to me and tipped me off to an idea: use the cookie cutters as a stamp.


I spent a day or two trying to figure out which stamps to use and what to stamp them on. I stopped by a second hand shop and found a white cotton dresser scarf which was just perfect. I decided to go with a patriotic theme and chose the star with red, white and blue paint. The stamping was really easy and only took me about 30 minutes to finish. In the end, I decided to do a little spatter painting to add a little interest (those are the blobs you see!). I think it adds a little interest. Cookie cutters come in so many shapes and sizes and I think this idea would work well for personalized curtains, pillows and even t-shirts. There are so many possibilities to ponder.

Tuesday, June 5, 2012

Mommy and Me

So a whole month has gone by without a project or a post from me. That’s not to say that I have had a lack of inspiration or challenges to overcome. My projects have just been piling up all around me! Spring always brings a flurry of activity trying to get the yard in order as well as an increase in my travels. My paid job has been a challenge lately too as I just try to keep up. It saps up a lot of my energy and that’s just not right!

Speaking about traveling, while visiting my mom this week-end I came up with a joint challenge. I thought this time around I would choose a partner to keep myself motivated. Have you ever heard of up cycling? It means to change an item either old or new to give it a new use or purpose. I have been intrigued by some of the ideas I’ve seen floating around and want to give it a try. My mother is the queen of upcycling. She can take just about anything and turn it into a work of art. I’m not sure I’ll be able to keep up with her but I’m going to give it a try.

Sunday, April 22, 2012

Old Books

I don’t know what it is about old books that attract me. Maybe it’s the worn covers in a variety of colors that feel so soft in my hands. Or maybe it’s the interesting topics and titles like “The Mind of the Adolescent Girl” and “Commodore Hornblower”. Maybe it’s the nostalgia of an old text book like the Dick and Jane books in elementary school. Anytime I stop at a yard sale, attend a book sale or visit an antique shop, I always check out the old books. I do actually read some of them but mostly I like to decorate with them. I love to see stacks of old books on desks and shelves. The sight of them is so warm and inviting.

Old books are receiving a new life these days in the crafting world. Maybe it’s all part of the repurposing movement. A local bookstore is sponsoring a book crafting contest (www.stompinggrounds.com). I can’t wait to stop by and check out the entries. In anticipation of the event, the library held a book crafting workshop. The session was unstructured which really freaked me out, but I managed to pull myself together and decorate a little box. It was fun to see the projects the other participants created.

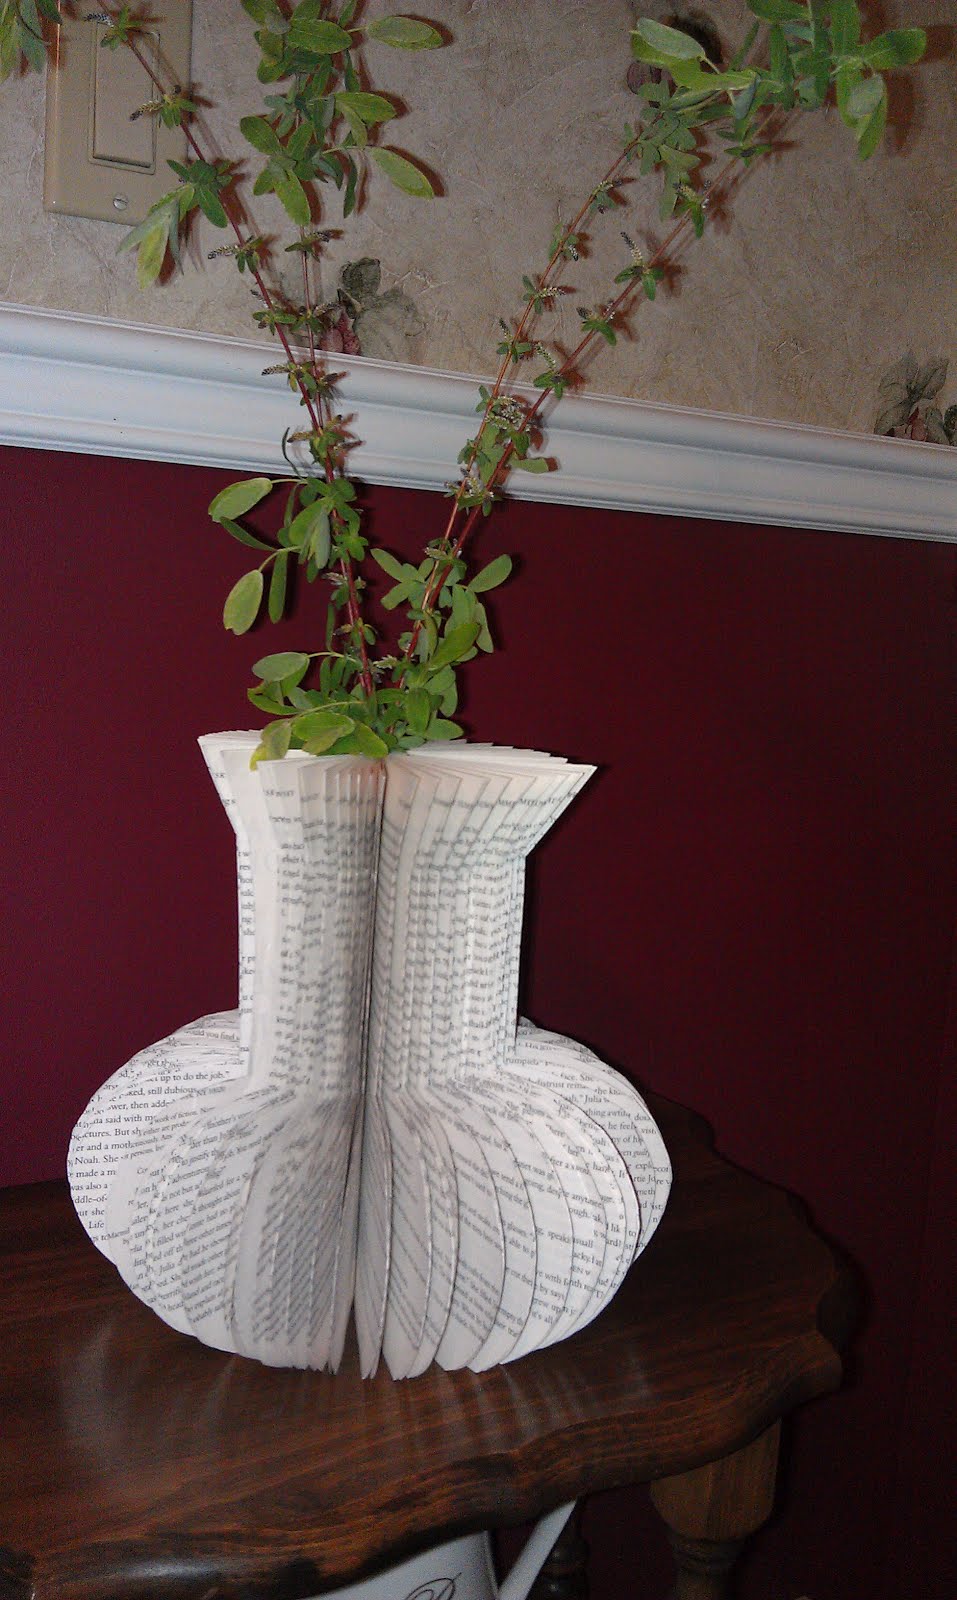
My interest piqued, I started to search online for more book crafting ideas. That’s when I came across the instructions for a book vase. It looked pretty simple and I decided to give it a try. I had just dropped off a load of books for the library book sale but another look around turned up a romance novel that was passed on to me. I really have to think hard before I choose a book to “use creatively”. I’m sorry, any book entitled “The Summer I Dared”, deserves to be cut up and it was an easy choice.

The instructions are simple. Cut your design out of a piece of cardboard. Transfer your design on the pages, cutting out three or four pages at a time. The instructions said to use a craft knife but I found that scissors worked much better. Once all the pages are cut, it’s time to cut off the cover. Make sure you leave the spine of the book intact. Glue the first and last page together and separate all the pages. Voila! You have a book vase! The center is pretty small, but a stem or two fit quite nicely in the center.

This was a fun little project and only took about an hour. A collection of a few different designs would make a nice grouping on a table. You can be sure I’ll be looking for similar titles at this year’s book sale to increase my collection.

Saturday, April 7, 2012

...while the blender was out


I had some broccoli languishing in my refrigerator this week-end and it inspired me to make some cream of broccoli soup. I don’t use my blender very often so I keep it in a box in the basement. This helps free up valuable space in my kitchen. My basement…well on occasion it does become a dumping ground for “stuff”. Long story short, I headed down to excavate it to cream up my soup.

While I was moving things around to uncover the blender, I came across a huge bag of paper scraps and my paper making supplies. I was reminded of a project on my list that I hadn’t gotten to yet: paper bowls. So, while the blender was out, I decided to make one. I started by tearing little scraps of blue paper and placing them in the blender with some water to make a pulp.

I decided to use a pan bottom as my mold and sprayed it with cooking spray in lieu of official mold release which I haven’t been able to find. I used a too much water to make my pulp and had to wring it out a bit before applying it to the pan bottom. The pulp went on fairly easily and before long I had a nice even base. Now it was time to dry it all out. I set the oven on low and put the pan with its paper hat in to dry. I was a little worried about starting a fire so I only left the oven on for about a half hour. By morning, the bowl was dry enough to remove from the mold, which it did beautifully.

Hmmm, the bowl was papery and weak and not good for any purpose as far as I could tell. It held its form well but was very fragile and had to be handled with extreme care or it would tear apart. While gazing at the bowl, I began to envision the sky blue bowl as a base for another paper project I had hanging around. Out came the mulberry paper and water color paints.
This technique is called washi chigiri-e. Paper shapes are torn from the mulberry paper and sprayed with a little water. A brush dipped in water color paint is then touched to the edge of the shape and the paint seeps into the paper. I chose to create a sunflower to place in the bowl.

I thought it only fair to showcase a failure as well as my successes. So here it is in all its lame glory, a stupid paper bowl serving no purpose whatsoever. I’m not sure what I ever thought I would do with a paper bowl but at least it’s off my list of things to do. I’ll keep thinking on it but for now I’m putting it back in my bag of scrap paper to recycle into some other project someday. By the way, the soup was delicious!