Challenge

chal-lenge: noun a calling to account or into question

Follow along as I challenge the tricks, tips, clever craft and decorating ideas and "simple" recipes that we clip, bookmark, and "pin" for trial at a later date.

Are they really worth the effort? Time (and I) will tell!


Showing posts with label Repurpose. Show all posts

Sunday, December 15, 2013

North Woods Santas


Many years ago, when crafting was still popular, I found the directions for these beautiful North Woods Santas.  They were easy to assemble and my friends and I got together one night and mass produced them to sell at craft shows that season.  Of course I had to keep a set for myself as well.  Every Christmas season I pull them out and adjust their coats and beards and arrange them on a side table for display.  Having packed them away for about 25 years now, they are looking pretty rough. 

A few years ago I decided that they were too shabby and that they wouldn’t be making their annual appearance.  When I had finished decorating that year, my youngest daughter looked around and asked where I had put the Wise Men.  I never thought of them that way but she was right, they are very humble Wise Men and I felt compelled to pull them out of their box for another season.

I don’t know why I was surprised that she had noticed, she was just a baby when I made them and they had been on display each year since.  I tucked that little piece of information into the corner of my mind to be pulled out at a later date.  This year she mentioned the need for more Christmas decorations and I went right to work on her very own set of Wise Men.  Little did I know what a challenge that would be.

The materials for the men are fairly simple:  wool for the coats, fur for the trim, wool roving for the beards, and little decorative items for them to hold.  No big deal.  Off I went to Joann Fabrics (the only fabric store in the area) for materials.  Can you believe they did not have any wool, not to mention any of the other things on my list?  Yikes!

Now what?  You guessed it, off to the thrift store.  I rifled through the skirts and coats and came up with a gray wool skirt and a cream colored cape that I thought I could make work.  I still needed fur and laughed to myself (well maybe out loud, too) when I found a tattered mink stole on the sale rack for $3.  You have to know I grabbed that one up!  I also found a little sweater that had a white rabbit collar.  I took the collar off the sweater and offered it back to the thrift shop.  I really didn’t need it.

My skills are a little rusty and it took me a while to get the men assembled, but I did.  Finding the little decorations was crazy and I made many trips to the craft stores looking without success.  Back to the thrift shops where I found a little basket and some dried grapevines that I used to make my own little wreaths. I was able to salvage other trinkets from past projects to repurpose.  There’s always something extra hanging around. Fortunately my mom still had the wool roving for the beards and she sent that along to me.  There is quite a bit of that left over so stay tuned.

Phew! They are finally finished and delivered to Massachusetts where they proudly stand as a centerpiece on her dining room table.  I love sending a little piece of myself to my daughters.  It’s especially nice at Christmas when we are apart and they can have a little reminder of their childhood home at the holidays.

Sunday, September 15, 2013

Book Lamp

The director of my local library requested donations from local artisans for the library’s silent auction. Hmm, what could I make? I immediately went to my project board on Pinterest to see what I could find. It seemed like a book-related piece would be the most appropriate. As everyone knows, I love old books and I love the idea of upcycling. I also have experience with silent auctions and know that people are really out looking for a bargain. Many times valuable items go for a small fraction of their value. I wanted to create a quality piece that didn’t cost a lot to produce. I checked out my supply of stuff on my shelves and I think I found the perfect project.
While working on a budget, I still wanted to make sure that my project would be worthy of being amongst real artisan offerings so I decided to take it one step at a time and make my decision whether or not to proceed after each step. The first step was to paint the books. I saved money by using paint that was already on my shelves. I sanded the books and applied the paint in several layers including sponging and antiquing to give the books an interesting look. The first step worked out well so I moved on to using decoupage to apply the fancy text to the spines, adding more visual interest.

Pleased with the design of the books, it was time to move on to the real nuts and bolts of the project. A lamp isn’t much good without a light bulb that actually lights up. Tom is so generous with his time and talents. He always finds a way to help me accomplish my creative goals. Wanting to make this a true upcycle project, I used an old silver lamp that my daughter no longer wanted. It was the perfect shape and size. It did take some maneuvering on Tom’s part to drill through all three books so the silver tube could be inserted. The books got a little scuffed up and I debating about moving forward but once I calmed down, I decided that this just added to the shabby chic style of the books. A little extra paint here and there and I was back on track.

I found a little lampshade at one of my second hand shops and knew it would be the perfect size. And for $.75, the price couldn’t be beat. I painted it up using the same colors I used on the books so that it would coordinate. The trim on the lampshade was the most expensive part of the project. I found the perfect trim at Joann’s but it was a bit pricey. I took advantage of the long line at the register and pulled up a 40% off coupon on my phone. Score! I’m really pleased with how the project turned out and hope it does well at the auction. It’s one thing to give projects away but putting one up for sale is nerve wracking!
It was fun to put this project together on a budget. I’ll be curious to see how well it does at auction. If you want to make your own lamp, you can find a great tutorial here. I modified the material list a bit so that I could use what I had on the shelves to save a little money. Check out your shelves and see what’s hanging around for your next project!

Sunday, August 25, 2013

Rustic Log Lamp


Camp decorating continues with this little project.  I’m having a good time creating pieces that refurbish flea market finds with a nod to nature. Part of my challenge is to spend as little money on the pieces as possible and I feel that I’m doing pretty well.  It’s also fun decorating a space where I can use the terms rustic and shabby chic to excuse any slip-ups.  Hey, don’t judge me I’m having fun. 


I was sitting outside our camp a few weeks ago enjoying the fresh air and scenery when a light bulb lit up in my head.  How about a lamp made out of a log?  It might sound crazy but lamps can be made from just about anything.  Wouldn’t a log lamp be perfect in the living room?  This was an idea I had to run by Tom because he would be the one to assemble it all.  Of course he was up for the challenge and went out to the woodpile to see what he could find.  Voila!  The perfect log was just waiting to be snapped up.  What makes a perfect log you may ask?  One that is already cut to size is handy for sure.  A nicely textured bark with a little moss growing up the side doesn’t hurt either.


Tom fashioned a base out of a piece of the maple we recently purchased to make up the bar.  So far the project cost is $0!  Unfortunately he couldn’t use any of the old lamp parts in my arsenal and purchased new pieces for $15. Once assembled, I sanded the base and applied several coats of polyurethane.  I started with a spray so as not to disturb any of the moss.  Once all the intriguing bits and pieces were adhered I brushed on the really durable stuff.  Nice!


Now for the lampshade.  If you’ve ever shopped for lampshades you know how expensive they can be.  Besides, I wanted something a little out of the ordinary.  I knew how I wanted to remake the shade but didn’t want to spend even the $10 it would cost to buy a new one to use as a base.  Hmm, which of my “junk” shops has the most potential?  The Salvation Army!  There I found a disgustingly dirty lampshade in the right size and shape for $.99.  What a find!


After cleaning up the lampshade, I started covering it with some jute I found in my stash.  I dabbed a bit of glue here and there to hold it all in place.  Ah, just the style I wanted.  As a little extra touch, I attached a ceramic leaf I had hanging around in my box of fall decorations. I think this will be just perfect as a woodsy accent piece in the living room.  At a cost of $16 who wouldn’t want a lamp made from a log?  Don’t all speak up at once…..
 

Thursday, August 15, 2013

Mexican Pillow

 
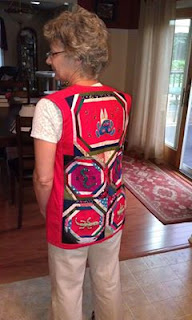
I have just finished a really fun project!  While making the rounds through the pre-owned clothing section of one of my favorite shops, I came across this fascinating vest.  Isn’t it great? 
 
Anyone observing me walking through these stores must really get a show as I gasp and laugh out loud over some of the things I find.  And then I grab them like someone else is shadowing me just waiting to take my great find right out of my hands. This was definitely one of those pieces.  Take a peek at these adorable reptiles.  Who wouldn’t just laugh out loud?


The vest as a piece of clothing really isn’t my style but the pieced squares used to make the vest are really well done.  I felt certain that I could deconstruct the piece and turn it into a pillow for someone else’s home.  Really, what am I going to do with a Mexican reptile pillow?  It doesn’t exactly fit my traditional décor.  But I know someone down south with a lovely patio where a pillow like this would feel quite at home. Sold, for $1!
 
There was quite a bit of decorative stitching that had to be picked out along with the seams.  I situated myself out on my deck with a drink nearby and got to work.  I was proud of myself for taking my time and really thinking before I made any cuts.  Maybe the sun and the cheerful fabric had a bit to do with that.
 
 
My patience sure paid off as I was able to reuse some of the red fabric to create the fourth edge and the lining as the back of the pillow.  It was a pretty easy job to sew the back and front of the pillow together.  It all worked out so nicely. I just love it when that happens. Isn’t it a festive little piece?

Monday, September 3, 2012

Kindle Cover

No project from Mom this week so I thought I would go it alone. Hopefully she will be able to catch up soon. I do enjoy her creativity.

Okay, I hear you moaning about yet another book project. I can’t help it, I just love working with books. I also love shopping for them at the many used book sales in the area. Although there are many books to choose from, finding a hard cover book with a
pretty cover that is exactly the right size as a Kindle has been a little tricky and I have been looking for a while. This particular book was so perfect for my project that my little hand just reached out and snapped it up before anyone else could get it. Like anyone else would want an old copy of Madame Bovary when they could pick up a Twilight novel or something equally as intriguing. What was I thinking? I really love the gold and muted red of this cover.

I have wanted to make a book cover for my Kindle for quite some time now. I feel it’s a nice mix of old and new technology. I did a bit of research before starting and found this great tutorial: www.unexpectedelegance.com if you are interested in making one for yourself.

Thursday, July 12, 2012

Challenge Week #4


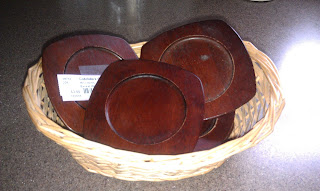
I asked my daughter to stop at a consignment shop with me last week-end. I thought a set of fresh eyes might help with my choice of project for the week. We went in the shop with no idea of what the next project would be. We wandered around for a bit not seeing anything very inspirational. My daughter picked up a set of wooden coasters as a possibility but I couldn’t think of anything to do with them. I did like that they were wooden and the center portion where you would place a glass looked perfect for framing something. Even though they were only $3, I didn’t buy them. I was thinking about the coaters as I drove home. Of course once I got home I had an idea and I headed back to the store to pick them up.

Saturday, June 30, 2012

Challenge: Week #3

I’m feeling like my regular haunts are not putting forth any creative material for my upcycling projects. I was in a bit of panic because I couldn’t find anything. I was headed down to the Hudson Valley to have some fun on a wine tour and wouldn’t have time to do any of that type of shopping. Maybe stop at some yard sales along the way? That didn’t sound like much fun to me. Although add a little wine and I might see things in a different light!

When I pulled into my daughter’s driveway, I could see that one of her neighbors had been cleaning out their back room. Several artist canvasses, some still wrapped in plastic, were piled up next to the dumpster ready to be taken away. I was sure I could find a project somewhere among them so I gathered up a few and tossed them in the trunk to take home with me. Dumpster diving wasn’t included in the contest rules, but I don’t think Mom will mind.

Sunday, June 17, 2012

Challenge: Week #2

It’s week two and we’re still going strong! I love this project Mom chose. She found this beat up old high chair at a yard sale. You can see that the arms are missing and it’s just covered with spattered paint. Obviously someone else took an old piece of furniture that was no longer useful in its original form and made a modification. I wonder how long it was used as a painting stool. It’s fun to see all the different colors of paint and imagine the rooms that were given a fresh coat of paint.


Always one to look beyond the obvious, Mom decided to freshen up this interesting piece with a new coat of paint (all one color this time!) and give it a new use. She has a green thumb and has many plants around the house. This unique plant stand provides a variety of height in her collection as well as fun visual interest. It’s the kind of thing that makes you say, “Hmm, why didn’t I think of that?”

Sunday, June 10, 2012

Challenge: Week #1


Well we did it! Mom and I both finished our projects on time this week. When we talked midweek I wasn’t sure it was going to happen. A week isn’t a very long time to find a treasure and develop it into a project and we were both feeling some pressure. Time will tell whether or not we can keep up the pace.

My project began with a set of Smithsonian souvenir cookie cutters. The set includes a star, flag, airplane, elephant and dinosaur. When I saw them in the store I just stared at them trying to figure out how I could use them. My daughter stepped up next to me and tipped me off to an idea: use the cookie cutters as a stamp.


I spent a day or two trying to figure out which stamps to use and what to stamp them on. I stopped by a second hand shop and found a white cotton dresser scarf which was just perfect. I decided to go with a patriotic theme and chose the star with red, white and blue paint. The stamping was really easy and only took me about 30 minutes to finish. In the end, I decided to do a little spatter painting to add a little interest (those are the blobs you see!). I think it adds a little interest. Cookie cutters come in so many shapes and sizes and I think this idea would work well for personalized curtains, pillows and even t-shirts. There are so many possibilities to ponder.

Saturday, March 3, 2012

Bottle Cap Coasters


While perusing the craft section at the Waterfront Arts Festival a few years ago, I spotted some coasters that featured beer bottle caps. They just screamed fun and good times. But it was such a hot day that it was all I could do just to keep walking let alone make a decision to buy anything. Of course once I got home and refreshed, I wished I’d taken the time to buy a few. Once a festival closes, you have no idea where to buy the wonderful things you passed by. Fortunately, I live in an area where there are LOTS of festivals and the hunt was on. From festival to festival we went in search of the coasters until I finally found them a year later at Canal Days in Fairport (a really nice festival if you are ever in the area!). Even though the selection was low by the time I found them, I did buy a few.

As I used the coasters I started to really look at how they were made and decided I wanted to try to recreate them. There were only three materials needed: resin, bottle caps and the container to act as the coaster itself. How hard could it be? It was much harder than I thought and the search took me several months. The resin was readily available at Michael’s and with my 40% off coupon was affordable. Because I wanted a real variety of bottle caps, I enlisted the help of my craft beer drinking friends. They really took my request to heart and always checked the bottle caps to make sure they were “cool” before making their purchase. Thanks, guys!

The real trick was finding the container. What was it? I searched on-line for petri dishes and that wasn’t it. I searched for stainless steel jar covers, no luck. I was thinking of giving up when I walked passed a display of jar candles at Big Lots. That was it! The covers on the jars were exactly what I was looking for. Now that I knew what I was looking for, I needed to find the source. Back to the internet I went. It took some doing, but I finally found a source and placed my order.

The process was very simple, mix up the resin, pour a small layer, and arrange the caps, let dry for 24 hours. This step is crucial because the bottle caps have a
tendency to float if the resin is poured to fill the entire form. Once dry, the bottle caps are adhered to the bottom of the coaster and another batch of resin can be poured to cover the bottle caps. I don’t think there is any way to avoid the little bubbles in the resin that are created from stirring. I used my hair dryer on a low temp to bring the bubbles to the surface so they could pop. Dry for another 24hours before using.

Mission accomplished! I think these little guys are adorable and make great party favors for a fun-loving group. I did puzzle over this project for quite some time. Could my brain power have been used to solve a larger problem than making beer coasters? Sure, but what fun would that be!

Sunday, May 9, 2010

Coffee Body Scrub


I love body scrubs. They do a great job of exfoliating dry skin and exposing wonderfully soft skin as well as coming in a variety of delicious scents. I always thought of them as a frivolous luxury because a good scrub can be a little pricey and don’t buy them often for that reason. Therefore, when I came across a recipe for a homemade body scrub in my recent issue of Body and Soul Magazine I decided to give it a try.

The recipe called for common ingredients including ½ cup of used coffee grounds, ½ cup of honey and 1 tablespoon of orange zest. It seemed like a simple recipe and I had no problem coming up with the ingredients. I grabbed the used coffee grounds from work. As you can imagine, there was quite a fight about who would take them home, but fortunately I won out for the sake of science. I bought a store brand honey for $2.29 and had an orange in the fridge. An inexpensive recipe is always appealing to me.

I was curious about the reason these ingredients were chosen for the recipe so I did a little research. I was amazed what I found out about the effects of coffee on the skin. Apparently, when coffee is applied directly to the skin it redistributes fat cells and therefore decreases the formulation of cellulite. The caffeine in the coffee scrub also acts as a vascular restrictor, shrinking blood vessels and helping to reduce varicose veins. More importantly, recent studies on laboratory mice indicate that when caffeine is applied directly to the skin it can prevent the occurrence of skin cancer caused by UV radiation. I love to drink coffee but had no idea of what else it had to offer.

As for the honey, apparently it is an antibacterial that acts as a moisturizer as well. Honey hydrates and softens the skin. It is also is good for acne prone skin as it inhibits the bacterial growth and therefore reduces the chance of breakouts. Of course honey is made with only natural ingredients and is rich in nutrients like vitamins B and C. The antioxidants found in honey benefit the skin and prevent it from the effects of premature aging. I had no idea.

I mixed the ingredients together very easily. The scent of the coffee with the orange zest was simply amazing. I filled up the bathtub with warm water and was ready to give this scrub a test run. I was a little concerned that the honey would make the scrub sticky but this was not the case. I applied the mixture in a vigorous circular motion. I was a little over zealous and it was pretty abrasive but it felt good. Note to self: go a little easier next time. I left the scrub on for a little bit to get the full effects of the caffeine. As soon as I rinsed the it all off, my skin felt amazing. The coffee scent did not stay on my skin and I moisturized as usual with no clashing of scents.

I cannot say enough about this homemade coffee body scrub. Given the exfoliation qualities of this recipe as well as the benefits of the ingredients and the price, I will definitely continue to use this body scrub and would recommend that you give it a try as well. As an additional tip, I would suggest that you use a coffee filter over your bathtub drain when you are through because all those coffee grounds cannot be good for anyone’s septic system. Enjoy!

Sunday, April 18, 2010

T-Shirt Necklace


All my April magazines featured “green” ideas for Earth Month. I feel pretty good about incorporating earth-friendly ideas into my everyday life. Although I have a way to go, I think I’m doing pretty well. I use my own tote bags for grocery shopping, I have CFL’s in all the lights that stay on for any extended period of time, I have a HE front loading washer and I wash all my laundry in cold water. I’m making a gradual switch to green cleaning products, use paper towels very sparingly and grow some of my own pesticide-free vegetables.

I have also increased the amount of “stuff” that gets recycled rather than thrown into the dumpster and am a great recycler of clothing by donating whatever I cannot use or turning them into cleaning rags. I found the t-shirt necklace featured in Body and Soul Magazine quite intriguing as a new use for old t-shirts and being in an eco-friendly state of mind, decided to give it a try.

The directions for the project are quite simple, although gathering supplies may not be. The first step for me was to find an old t-shirt. Now who doesn’t have an old t-shirt hanging around? Well, me for one. Because I donate all my unused clothing, an old t-shirt was not to be found in my drawers. After a bit of a search, I found a pink t-shirt in my daughter’s room. I hope she won’t miss it!

Next I needed to find scissors. I don’t know what it is about scissors in my house, but I can rarely find a pair when I need them. My search ended in the garage where I found my good sewing scissors covered in dry wall compound. I guess that’s my fault for leaving them out in plain sight. I washed them off as best I could but I think it’s fair to say that they are not going to be much use to me any longer. Fortunately, my mother had given me a nice rotary cutter which was ideal for the job.

Once you find your t-shirt and scissors, you are ready to start. Honestly, it took me longer to find the supplies than it did to complete the project. Cut the hem off the shirt and measure out 20, ¾ inch strips up the shirt. I used a women’s medium shirt so this measurement took me right up to the arm seam. After cutting 20 strips, hold one seam in each hand and pull. This stretches the fabric and forms the strips into little tubes. Pile all the strips together, twist them in a figure 8 and use a six inch strip of the shirt to wrap around the back to secure. It’s really that simple.

I think the end result is really pretty cute. I would suggest that if you decide to make your own necklace that you use a shirt larger than a women’s medium or make sure you put the necklace on before you apply your makeup. Otherwise, your make-up will end up on your necklace as it's a pretty tight fit going over your head.

Actually, I’m not sure I would call this project a necklace as much as a scarf. I think it has great potential as a nice summer-time scarf that can help to hide the skin of an aging neck. I don’t know about you, but I can’t wear a turtleneck all summer long.